google maps apiでマーカー表示、画像表示、注釈表示をしてみる
シンプルなマーカー表示
マーカーを表示するには
①: google.maps.Markerでオブジェクト作成
②: mapに設定
の2段階で表示することができます。
最小のコードは以下。
marker = new google.maps.Marker({
    position: new google.maps.LatLng(#{緯度}, #{経度}),
    map: map
});
marker.setMap(map);
以下はサンプルコードとなります。
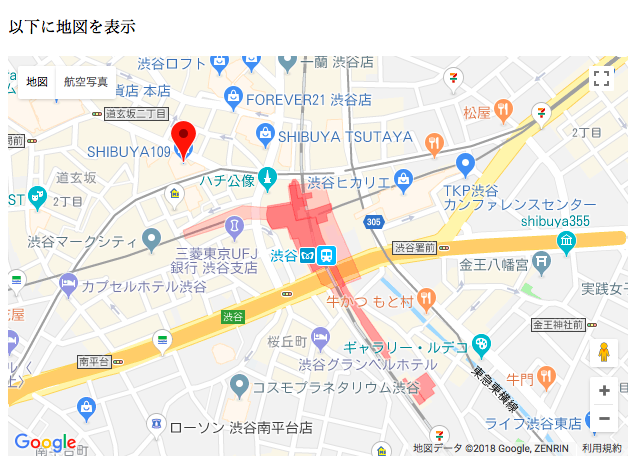
中心: 渋谷 マーカー: 109で表示してみます。
show_simple_marker.html
<!DOCTYPE html>
<html lang="ja">
<head>
    <meta charset="utf-8">
    <title>GoogleMapsAPIテスト</title>
</head>
<body>
    <p>以下に地図を表示</p>
    <div id="map" style="width:620px; height:400px">
    </div>

    <script type="text/javascript">
        function initMap () {
            var directionsDisplay;
            var directionsService = new google.maps.DirectionsService();
            var map;

            directionsDisplay = new google.maps.DirectionsRenderer();

            // mapの中心(渋谷駅)
            var mapOptions = {
                zoom: 16,
                center: new google.maps.LatLng(35.658034, 139.701636)
            }

            map = new google.maps.Map(document.getElementById("map"), mapOptions);

            // マーカー表示をする
            marker = new google.maps.Marker({
                position: new google.maps.LatLng(35.659657, 139.698764),
                map: map
            });
            marker.setMap(map);
        }
    </script>

    <script async defer src="https://maps.googleapis.com/maps/api/js?key=YourAPIKey&callback=initMap"></script>
</body>
</html>
※ YourAPIKeyの部分は取得したAPIKeyへ置換してください。
結果は以下のように、中心に渋谷駅が、109にマーカーが表示されるはずです。
マーカーの文字を変える
マーカーの文字の変更は、google.maps.Markerのlabel属性で変更できます。
index.js
marker = new google.maps.Marker({
    position: new google.maps.LatLng(35.659657, 139.698764),
    label: "109",
    map: map
});
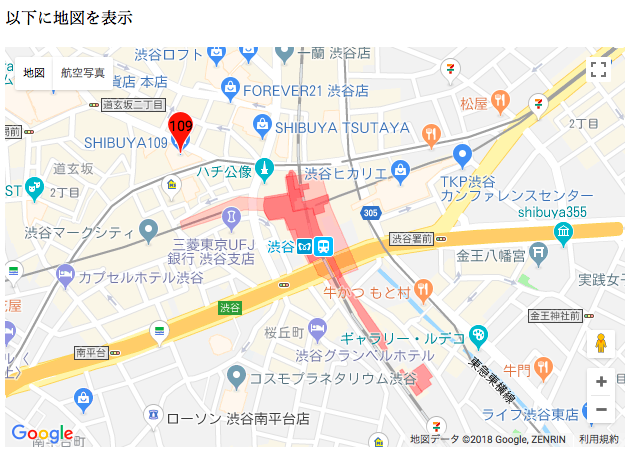
結果としては以下のように、マーカーの点が109という文字に変わります。
マーカーの画像を変える
マーカーの画像の変更は、google.maps.Markerのicon属性で変更することができます。
index.js
marker = new google.maps.Marker({
    position: new google.maps.LatLng(35.659657, 139.698764),
    icon: "cloth.png", //
    map: map
});
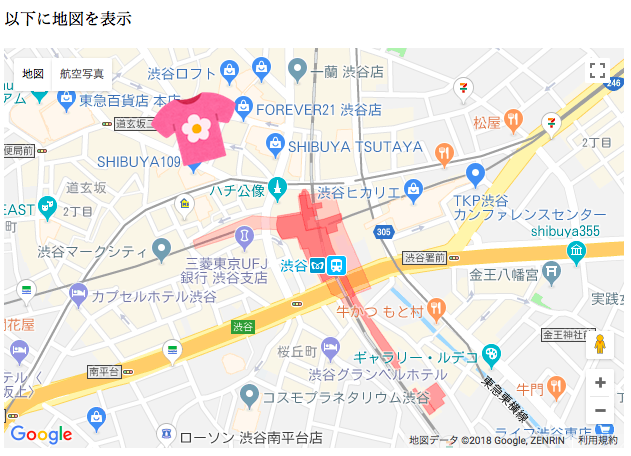
結果としては以下のように、マーカーが服の画像に変わります。
マーカーに注釈を加える
マーカーに注釈を加えるには、google.maps.InfoWindowが別途必要となります。
以下にサンプルソースを載せました。
index.html
<!DOCTYPE html>
<html lang="ja">
<head>
<meta charset="utf-8">
<title>GoogleMapsAPIテスト</title>
</head>
<body>
<p>以下に地図を表示</p>
<div id="map" style="width:620px; height:400px">
</div>
<script type="text/javascript">
function initMap () {
var directionsDisplay;
var directionsService = new google.maps.DirectionsService();
var map;
// 地図の表示
directionsDisplay = new google.maps.DirectionsRenderer();
var mapOptions = {
zoom: 16,
center: new google.maps.LatLng(35.658034, 139.701636)
}
map = new google.maps.Map(document.getElementById("map"), mapOptions);
// マーカー
marker = new google.maps.Marker({
position: new google.maps.LatLng(35.659657, 139.698764),
map: map
});
marker.setMap(map);
// 吹き出し
var infoWindow;
infoWindow = new google.maps.InfoWindow({ // 吹き出しの追加
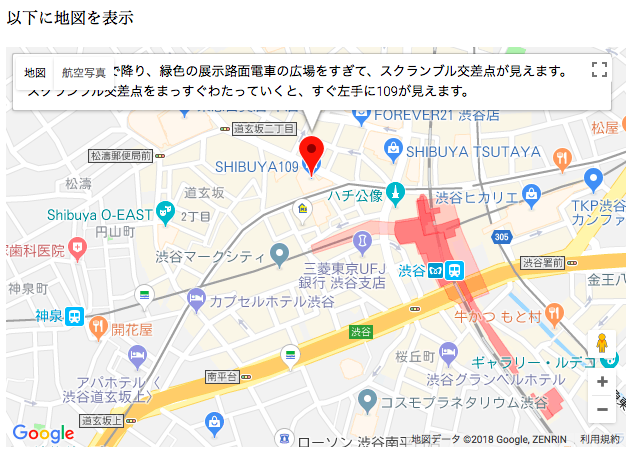
content: '<div class="sample">JRハチ公出口で降り、緑色の展示路面電車の広場をすぎて、スクランブル交差点が見えます。<br>スクランブル交差点をまっすぐわたっていくと、すぐ左手に109が見えます。</div>' // 吹き出しに表示する内容
});
infoWindow.open(map, marker);
}
</script>
<script async defer src="https://maps.googleapis.com/maps/api/js?key=YourAPIKey&callback=initMap"></script>
</body>
</html>
※ YourAPIKeyの部分は取得したAPIKeyへ置換してください。
結果は以下のように、中心に渋谷駅が、109にマーカーが表示され、上にマーカーの説明文が出ます。
企業ならば道案内の文章の挿入等で使用できるかと思います。
クリックしたら注釈を出すようにする
クリック時に注釈を出すときは、markerに対してListnerを追加する必要があります。
addlistner.js
marker.addListener('click', function() {
    // 行いたい処理
});
以下にサンプルコードを置いておきます。
index2.html
<!DOCTYPE html>
<html lang="ja">
<head>
    <meta charset="utf-8">
    <title>GoogleMapsAPIテスト</title>
</head>
<body>
    <p>以下に地図を表示</p>
    <div id="map" style="width:620px; height:400px">
    </div>

    <script type="text/javascript">
        function initMap () {
            var directionsDisplay;
            var directionsService = new google.maps.DirectionsService();
            var map;

            // 地図の表示
            directionsDisplay = new google.maps.DirectionsRenderer();
            var mapOptions = {
                zoom: 16,
                center: new google.maps.LatLng(35.658034, 139.701636)
            }
            map = new google.maps.Map(document.getElementById("map"), mapOptions);

            // マーカー
            marker = new google.maps.Marker({
                position: new google.maps.LatLng(35.659657, 139.698764),
                // icon: "cloth.png",
                map: map
            });
            marker.setMap(map);

            // 吹き出し
            var infoWindow;
            infoWindow = new google.maps.InfoWindow({ // 吹き出しの追加
                content: '<div class="sample">JRハチ公出口で降り、緑色の展示路面電車の広場をすぎて、スクランブル交差点が見えます。<br>スクランブル交差点をまっすぐわたっていくと、すぐ左手に109が見えます。</div>' // 吹き出しに表示する内容
            });

            マーカークリック時の対応
            marker.addListener('click', function() {
                infoWindow.open(map, marker);
            });
        }
    </script>

    <script async defer src="https://maps.googleapis.com/maps/api/js?key=YourAPIKey&callback=initMap"></script>
</body>
</html>
結果としては同じですが、クリックすると注釈が見られるようになっています。
Googleスプレッドシート入門編
Googleスプレッドシート応用編
Googleスプレッドシート応用編
-- 関数について
-- 関数について
Googleドライブ
Googleドキュメント
Googleフォーム
Google HTMLService
Google Apps Script と Slack